

Dive into the world of Bun JS testing with our comprehensive beginner’s guide. Learn how to set up your environment, understand Bun’s built-in test runner, and write your first tests. Master the basics of Bun JS testing and boost your development skills today!
1. Introduction
Bun JS is a fast all-in-one JavaScript runtime that’s gaining popularity in the development community. It aims to provide a complete toolkit for JavaScript and TypeScript developers, including a package manager, transpiler, and most importantly for our topic, a built-in test runner.
Testing is a crucial part of software development. It helps ensure that your code works as expected, catches bugs early, and makes it easier to maintain and refactor your codebase. With Bun JS, testing becomes an integral part of your development workflow, allowing you to write and run tests efficiently.
In this tutorial, we’ll explore Bun JS testing, starting from the basics and working our way up to more advanced concepts. By the end, you’ll have a solid foundation in Bun JS testing and be ready to implement robust testing practices in your projects.
To follow along with this tutorial and access all the code examples, you can check out the accompanying GitHub repository:
https://github.com/NickyBall/bun-testing-tutorial
This repository contains all the code samples and exercises we’ll be working through in this tutorial. Feel free to clone or fork it to your local machine for a hands-on learning experience.
2. Setting Up Your Environment
Before we dive into testing, let’s set up our development environment:
- Install Bun JS:
Open your terminal and run the following command:
curl -fsSL https://bun.sh/install | bashThis will download and install Bun on your system.
- Verify the installation:
Runbun --versionto ensure Bun is correctly installed. - Create a new Bun project:
   mkdir bun-testing-tutorial
   cd bun-testing-tutorial
   bun init
This will initialize a new Bun project with a basic structure.
3. Understanding Bun’s Built-in Test Runner
Bun comes with a built-in test runner, which means you don’t need to install any additional libraries to start testing. This integration offers several advantages:
- Speed: Bun’s test runner is designed to be fast, leveraging Bun’s overall performance optimizations. For a deeper dive into Bun’s speed and efficiency, especially in the context of Next.js projects, check out our previous article: Speed, Efficiency, and Simplicity: Why Bun Might Be Your Next Go-To for Next.js Projects in 2024.
- Simplicity: No need to configure external testing libraries.
- Native TypeScript support: Write your tests in TypeScript without additional setup.
Compared to other testing frameworks like Jest or Mocha, Bun’s test runner is more lightweight and integrated into the runtime. While it may not have all the features of more established frameworks, it provides a solid foundation for most testing needs.
To use Bun’s test runner, simply create files with a .test.ts or .test.js extension in your project. Bun will automatically recognize these as test files.
Here’s a basic example of a test file:
import { expect, test } from "bun:test";

test("addition works", () => {
  expect(2 + 2).toBe(4);
});
To run your tests, use the command:
bun testBun will automatically find and run all test files in your project.
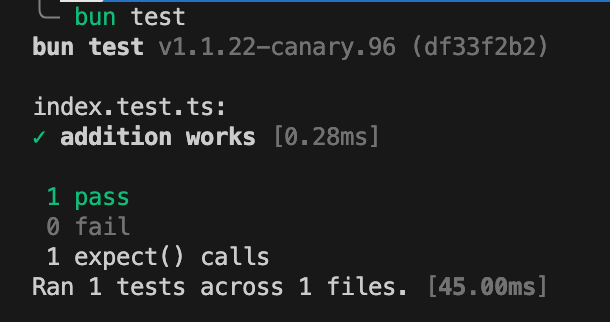
In the next section, we’ll dive deeper into writing and running your first test with Bun JS.
4. Writing Your First Test
Now that we understand the basics of Bun’s test runner, let’s write our first test. We’ll start with a simple function and then write a test for it.
Create a new file called math.ts in your project root:
// math.ts
export function add(a: number, b: number): number {
return a + b;
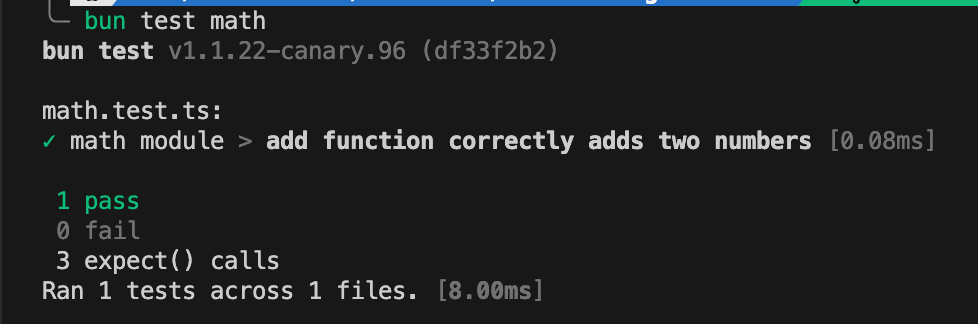
}Now, let’s create a test file for this function. Create math.test.ts:
// math.test.ts
import { expect, test, describe } from "bun:test";
import { add } from "./math";

describe("math module", () => {
  test("add function correctly adds two numbers", () => {
    expect(add(2, 3)).toBe(5);
    expect(add(-1, 1)).toBe(0);
    expect(add(0, 0)).toBe(0);
  });
});
Run your test using the command:
bun testYou should see output indicating that your test has passed.
5. Basic Assertion Types
Bun’s test runner provides several assertion types to help you verify your code’s behavior. Here are some common ones:
Equality Assertions
expect(value).toBe(expectedValue);  // Strict equality
expect(value).toEqual(expectedValue);  // Deep equality for objects
Truthiness Assertions
expect(value).toBeTruthy();
expect(value).toBeFalsy();
Comparison Assertions
expect(value).toBeGreaterThan(threshold);
expect(value).toBeLessThanOrEqual(threshold);
Error Assertions
expect(() => functionThatThrows()).toThrow();
expect(() => functionThatThrows()).toThrow(ErrorType);
Let’s add a new test to our math.test.ts file to demonstrate some of these assertions:
// math.test.ts
import { expect, test, describe } from "bun:test";
import { add } from "./math";

describe("math module", () => {
  // ... previous test ...

  test("add function handles various inputs", () => {
    expect(add(1, 2)).toBeGreaterThan(2);
    expect(add(-1, -1)).toBeLessThan(0);
    expect(() => add(1, "2")).toThrow(TypeError);
  });
});
6. Test Organization
As your test suite grows, it’s important to keep your tests organized. Bun provides describe blocks to group related tests together.
import { expect, test, describe } from "bun:test";
import { add, subtract } from "./math";

describe("math module", () => {
  describe("add function", () => {
    test("correctly adds two numbers", () => {
      expect(add(2, 3)).toBe(5);
    });

    test("handles negative numbers", () => {
      expect(add(-1, 1)).toBe(0);
    });
  });

  describe("subtract function", () => {
    test("correctly subtracts two numbers", () => {
      expect(subtract(5, 3)).toBe(2);
    });
  });
});
Bun also provides beforeAll, afterAll, beforeEach, and afterEach hooks for setup and teardown operations:
describe("database operations", () => {
  beforeAll(() => {
    // Set up database connection
  });

  afterAll(() => {
    // Close database connection
  });

  beforeEach(() => {
    // Reset database state
  });

  test("inserts a record", () => {
    // Test insertion
  });

  test("deletes a record", () => {
    // Test deletion
  });
});
7. Asynchronous Testing
Many operations in JavaScript are asynchronous. Bun’s test runner makes it easy to test asynchronous code.
For promises, you can return the promise directly:
import { expect, test } from "bun:test";

function fetchData() {
  return Promise.resolve("data");
}

test("fetchData returns correct data", () => {
  return fetchData().then(data => {
    expect(data).toBe("data");
  });
});
For async/await syntax, just mark your test function as async:
test("fetchData returns correct data", async () => {
  const data = await fetchData();
  expect(data).toBe("data");
});
You can also test that a promise rejects:
function failingFetch() {
  return Promise.reject(new Error("fetch failed"));
}

test("failingFetch throws an error", async () => {
  await expect(failingFetch()).rejects.toThrow("fetch failed");
});
These sections cover the basics of writing tests, using different assertion types, organizing your tests, and handling asynchronous code in Bun JS testing. In the next sections, we’ll explore more advanced topics like mocking and snapshot testing.
8. Mocking in Bun JS
Mocking is a crucial technique in unit testing that allows you to isolate the code being tested by replacing dependencies with controlled substitutes. Bun provides built-in mocking capabilities that are easy to use.
Creating Mock Functions
You can create a mock function using mock.fn():
import { expect, test, mock } from "bun:test";

test("mock function", () => {
  const mockFn = mock.fn();
  mockFn("hello");

  expect(mockFn).toHaveBeenCalled();
  expect(mockFn).toHaveBeenCalledWith("hello");
});
Mocking Modules
Bun allows you to mock entire modules. Here’s an example of mocking a database module:
// database.ts
export const db = {
  connect: () => console.log("Connected to real database"),
  query: (sql: string) => console.log(`Executing query: ${sql}`)
};

// database.test.ts
import { expect, test, mock } from "bun:test";
import { db } from "./database";

mock.module("./database", () => ({
  db: {
    connect: mock(() => { }),
    query: mock((q) => q),
  }
}));

test("database operations", () => {
  db.connect();
  db.query("SELECT * FROM users");

  expect(db.connect).toHaveBeenCalled();
  expect(db.query).toHaveBeenCalledWith("SELECT * FROM users");
});
9. Snapshot Testing
Snapshot testing is a powerful tool for detecting unintended changes in your code’s output. It’s particularly useful for testing UI components or complex data structures.
Here’s how you can use snapshot testing in Bun:
import { expect, test } from "bun:test";

function generateComplexObject(name: string, age: number) {
  return {
    name,
    age,
    createdAt: new Date(),
    preferences: {
      theme: "dark",
      notifications: true
    }
  };
}

test("generateComplexObject snapshot", () => {
  const object = generateComplexObject("John Doe", 30);

  // The first time this test runs, it will create a snapshot.
  // On subsequent runs, it will compare the output to the snapshot.
  expect(object).toMatchSnapshot({
    createdAt: expect.any(Date) // Ignore the exact date value
  });
});
When you run this test for the first time, Bun will create a snapshot file. On subsequent runs, it will compare the output to the existing snapshot.
To update snapshots (when you’ve made intentional changes), run:
bun test --update-snapshots10. Code Coverage
Code coverage is a metric that helps you understand how much of your code is being tested. Bun provides built-in support for code coverage reports.
To run your tests with coverage, use the --coverage flag:
bun test --coverageThis will generate a coverage report in the terminal.
Here’s an example of how to interpret the coverage report:
File           | % Stmts | % Branch | % Funcs | % Lines |
----------------|---------|----------|---------|---------|
 math.ts        |   100   |    75    |   100   |   100   |
database.ts | 80 | 50 | 75 | 80 |- % Stmts: Percentage of statements executed
- % Branch: Percentage of branch points (like if statements) covered
- % Funcs: Percentage of functions called
- % Lines: Percentage of executable lines covered
Aim for high coverage, but remember that 100% coverage doesn’t guarantee bug-free code. Focus on writing meaningful tests that cover critical paths in your application.
In the next section, we’ll discuss best practices for writing effective tests with Bun JS.
11. Best Practices for Bun JS Testing
As you become more comfortable with Bun JS testing, keep these best practices in mind:
- Test Isolation: Each test should be independent. Use
beforeEachandafterEachhooks to set up and tear down test environments. - Descriptive Test Names: Use clear, descriptive names for your tests. A good format is “it should [expected behavior] when [condition]”.
- Single Assertion Per Test: Generally, stick to one assertion per test. This makes it easier to identify what’s broken when a test fails.
- Test Edge Cases: Don’t just test the happy path. Include tests for edge cases, invalid inputs, and error conditions.
- Keep Tests Fast: Bun is known for its speed. Leverage this by keeping your tests quick to run. This encourages frequent testing.
- Use Test Doubles Wisely: While mocking is powerful, overuse can lead to tests that don’t reflect real-world scenarios. Use mocks judiciously.
- Continuous Integration: Integrate your Bun tests into your CI/CD pipeline to catch issues early.
Example of a well-structured test:
import { expect, test, beforeEach, describe } from "bun:test";
import { UserService } from "./userService";

describe("UserService", () => {
  let userService: UserService;

  beforeEach(() => {
    userService = new UserService();
  });

  test("should create a user when given valid data", async () => {
    const userData = { name: "John Doe", email: "john@example.com" };
    const user = await userService.createUser(userData);
    expect(user).toHaveProperty("id");
    expect(user.name).toBe(userData.name);
    expect(user.email).toBe(userData.email);
  });

  test("should throw an error when creating a user with invalid email", async () => {
    const userData = { name: "John Doe", email: "invalid-email" };
    await expect(userService.createUser(userData)).rejects.toThrow("Invalid email");
  });
});
12. Troubleshooting Common Issues
Even with the best practices, you might encounter some issues. Here are some common problems and their solutions:
- Tests are not being detected:
- Ensure your test files end with
.test.tsor.test.js. - Check that you’re running
bun testfrom the correct directory.
- Asynchronous tests timing out:
- Increase the timeout for slow tests:
test("slow test", { timeout: 10000 }, async () => { ... }). - Ensure you’re properly handling promises or using
async/await.
- Mocks not working as expected:
- Verify that you’re mocking at the correct level (function, module, etc.).
- Ensure mocks are set up before they’re used in the test.
- Snapshot tests always failing:
- If changes are intentional, update snapshots with
bun test --update-snapshots. - For unintentional changes, review the diff in the test output to identify the issue.
- Code coverage reports showing unexpected results:
- Ensure all your source files are being included in the test run.
- Check for any ignored directories or files in your configuration.
Remember, the Bun community and documentation are great resources for troubleshooting more specific issues.
13. Conclusion
In this tutorial, we’ve covered the essentials of Bun JS testing, from writing your first test to advanced topics like mocking and snapshot testing. We’ve seen how Bun’s built-in test runner provides a fast, efficient, and user-friendly testing experience.
Key takeaways:
- Bun JS comes with a powerful built-in test runner.
- Writing tests in Bun is straightforward and similar to other popular testing frameworks.
- Bun supports advanced testing features like mocking, snapshot testing, and code coverage.
- Following best practices leads to more reliable and maintainable tests.
As you continue your journey with Bun JS testing, remember that testing is an integral part of the development process. It helps ensure the reliability and maintainability of your code, catching bugs early and providing confidence in your applications.
14. Additional Resources
To further enhance your Bun JS testing skills, here are some valuable resources:
- Official Bun Documentation:
https://bun.sh/docs/cli/test
The official docs are always a great place to start for the most up-to-date information. - Bun GitHub Repository:
https://github.com/oven-sh/bun
Check out the source code and contribute to the project. - Bun Discord Community:
https://bun.sh/discord
Join the Discord server to connect with other Bun developers and get help. - Testing Best Practices:
https://github.com/goldbergyoni/javascript-testing-best-practices
While not Bun-specific, this repository offers excellent general JavaScript testing practices. - My Previous Article on Bun and Next.js:
Speed, Efficiency, and Simplicity: Why Bun Might Be Your Next Go-To for Next.js Projects in 2024
For more context on why Bun is gaining popularity in the JavaScript ecosystem.
Remember, the best way to improve your testing skills is through practice. Keep writing tests, experimenting with different scenarios, and refining your approach. Happy testing with Bun JS!